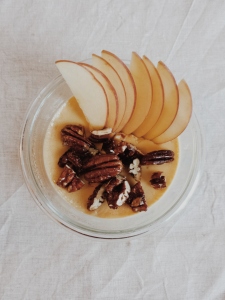
Maple-Buttermilk Pots de Creme with Caramelized Pecans

Processed with VSCOcam with m5 preset

Guys, do you want to impress your guests with a dessert, that’s absolutely delicious yet easy to make? This is it! Pots de creme sounds fancy because it’s in french..  🙂 (honestly, pots of cream, or custard don’t sound as good) but it’s basically baked custard in small individual cups. This one is made with tangy buttermilk and cream, topped with crunchy maple syrup and rum glazed pecans and apple slices.

Maple-Buttermilk Pots de Creme with Caramelized Pecans

Serves 4-6

175 ml buttermilk
175ml single cream
80ml maple syrup, preferably B grade
1/2 tsp pure vanilla essence
A pinch salt
1.5 tsp cornstarch
4 egg yolks

For the pecans
50g pecan halves
2 Tbsp maple syrup
1 tsp dark rum
a good pinch salt

To serve: apple slices or pear slices

1. Preheat the oven to 150 degrees celsius. Bring the buttermilk, cream, maple syrup, vanilla, and salt to a gentle simmer. Meanwhile, whisk together the egg yolks and corn starch in a small heat proof bowl.
2. Once the cream mixture is heated to a gentle simmer, take it off the heat. Pour a small ladle into the egg yolks in a steady stream while whisking constantly. Pour the mixture back into the pot, while whisking constantly.
3. Over a low heat, whisk the cream-egg mixture until it just starts to steam. Do not let the egg yolks curdle.
4. Pour the mixture into small, oven proof cups/pots. Place the pots in a deep baking dish, pour hot water in the baking dish, until the water comes half way up the sides of the pots. Bake for 30mins. Let the pots cool to a room temperature before putting it in the fridge for at least 4 hours.
5. To glaze the pecans, mix all the ingredients together and lay them out on a lined baking sheet. Bake for about 10-15 mins in 150 degrees celsius, stirring once half way through.
6. Serve the pots with chopped pecans and sliced apple of pear.

Earl Grey Milk Jam

Processed with VSCOcam with m5 preset

Happy new year, everyone!

I hope your end of the year was filled with love, wonderful and indulgent food, and delicious wine. Are you on a detox? I’m not a believer of detox, but I do cut down on a few things in January, like meat (I eat a lot of meat in December, compared to the rest of the year), less alcohol, and a little less cheese (because frankly, how can you cut down on cheese completely?). Sugar? Yes, of course we all should cut down on sugar, but on cold grey mornings, I swear this recipe will brighten up your day. It will be your new Nutella. It’s super easy to make, and it can be doubled with no trouble. The jam or confiture de lait, is full of creamy, milky, sweet goodness with a hint of earl grey. Spread some on toast, drizzle over pancakes and waffles, or just spoon straight out of the jar. Go and make this today! Xoxo A.

Earl Grey Milk Jam

This is adapted from my aunt’s cookbook, Cold Sweets. (available only in Korean, unfortunately!). To sterilize a jar, wash the jar and the lid in hot water with soap. Dry upside down in an oven over 110 degrees celsius for about 10 mins. 

* Make sure you use a wide frying pan with high sides, and a silicon spatula for baking*.

Makes a 200ml jar

250ml whole milk

2 earl grey tea bags

250ml single cream

2.5 Tbsp raw cane sugar or vanilla sugar

1 Tbsp honey

A pinch of salt

30g butter

1. Heat the milk to a gentle simmer. Remove from the heat and steep the tea for about 10 mins. Remove the tea bags.

2. In a medium to large frying pan with high sides, bring the infused milk, sugar, honey, and salt to a gentle simmer. Stir until the sugar has dissolved.

3. Add the cream to the milk in 3 batches, stirring constantly until the cream has been incorporated.

4. Add the butter, and let it melt. Simmer the sauce in a medium heat for about 20 mins, stirring frequently to prevent the jam from sticking to the bottom. After about 20 mins, stir constantly until the consistency of the jam is similar to a thin syrup. It will thicken up once cooled.

5. Pour into a hot sterilized jar and put the lid on to seal. Keep in the fridge for up to 5 days, although I’m sure it will be eaten up in a day or two!

Mango and Raspberry Clafoutis with Coconut

DSC_1798

I own many, many cookbooks. I love most of them and have fond memories cooking from the books, not only because the recipes are great but also they remind me of a particular time and space that I was in when I bought them or received them as gifts. The one and only cookbook I brought with me from Australia to Germany was Marie Claire Supper Cookbook by Jody Vassallo. It’s a tiny book with 36 easy and simple but very stylish recipes for suppers during the week. It was given to me by my friend Angelique as a graduation present. I cooked many meals from it in the beginning, although I have to say some ingredients were hard to come by in Germany 10 years ago. Australia is always a step or two ahead in the culinary world, mainly because of their incredible produce and the melting pot of immigrants in the country. And even though I ate my fare shares of cadbury chocolate frogs, frozen meat pies, (oops did I just say that?), greasy lemon chicken and etc, now I think back and I remember most people being genuinely interested in food. When I read these cookbooks from the 90s to early 2000, the recipes in those books I have photographed below, are still in sync with what we would see in food magazines and blogs today. I also own two Vogue Australia Entertaining cookbooks from 10-15 years ago and they are also just gorgeous; full of beautiful photographs and simple yet elegant multi-cultural and fusion recipes. I saw on buzzfeed a month ago, that the food Aussies miss the most is Asian food when they go overseas. I also miss going to the Adelaide Central Market and slurping on a big steaming bowl of spicy Laksa or a comforting bowl of Bibimbap from Sunmi’s. Mmmm…

DSC_1813

DSC_1816

I guess I have come a long way. I live on more than fried eggs and instant noodles nowadays, Ange! Thanks!! 🙂

Anyways, enough of nostalgia for today. I have baked a dessert! It was slightly adapted from Table Australia. I just looked up but apparently this magazine hasn’t been printed for many years now. Clafoutis is a very classic french dessert that according to some articles, every housewife can whip up without a recipe. (correct me if I’m wrong!) This version is very unfrench, so I’m not sure if I should call it a “clafoutis” and thereby offend some die-hard french food connoisseurs, but the basic idea here is the same. You have some fruit, whip up a egg-y batter, bake, and eat warm. The addition of coconut milk, raspberries, mango, and lime gives this classic dessert a ring of change. I reduced the amount of sugar from the original recipe, swapped mango instead of pear, added some spice, lime, and desiccated coconut. I don’t know about you, but it reminded me a bit of warm Aussie sunshine. Enjoy! xo-A.


DSC_1814


DSC_1801


Mango and Raspberry Clafoutis with Coconut

Slightly adapted from Table Australia Cakes, Biscuits and Puddings

Note: Make sure your coconut milk is very well shaken. The cream and the water should be well emulsified when you open the can. If not, run it through a blender quickly. And I don’t usually separate the eggs in clafoutis, but chocolate&zucchini’s cherry chestnut flour clafoutis gave me the tip. It turned out fluffier than usual. If you are too lazy, just blend the eggs (both white and yolk) into the batter.

Serves 4-6

1 medium-sized mango, peeled and flesh cut into cubes

250g frozen raspberries (no need to be thawed)

1 Tbsp Muscovado or brown sugar

1/2 Tbsp corn starch

1/4 tsp ground ginger

Juice of 1/2 lime

Zest of 1 lime

2 eggs, separated

70g raw cane sugar

50g all-purpose flour

20g unsweetened, dessicated coconut

1/2 tsp vanilla essence

200ml coconut milk from a very well shaken can

10 shredded mint leaves, to serve.

1. Preheat the oven to 180 degrees celsius. Generously grease a 22 cm pie dish or any deep, medium sized oven-proof dish.  with butter.

2. Add the mango cubes and 2/3 of the raspberries in the pie dish. Sprinkle the brown sugar, lime juice, corn starch and ground ginger over the fruits and toss to mix. Set aside for 10 mins.

3. In a large bowl, whisk the egg yolks, coconut milk, flour, vanilla, sugar, desiccated coconut and lime zest until a smooth batter is formed.

4. In clean bowl, whisk the egg whites until soft peak forms. Gently fold into the batter in two batches.

5. Pour the final batter over the fruits. Scatter the remaining raspberries on top of the batter and gently push into the batter.

6. Bake for 25-30 mins until the top is puffed and golden. Leave to rest for about 20 mins. Serve warm with some shredded mint leaves on top.

DSC_1818

DSC_1817

Chocolate Cherry Tartlets

DSC_1437

It’s been a while since I posted something sweet. To be exact, I have one dessert recipe on here so far. Maybe you can tell, but I’m not much of a baker or have a particularly sweet tooth. But the other day, looking at the frozen section at a supermarket made me think about using frozen fruits in winter. I usually have a bag of frozen raspberry and strawberries in my freezer for smoothies, but I have never noticed the cherries in the supermarket. There are many jars of canned and sweetened cherries in German supermarkets but frozen ones sounded much better to bake with. They are, of course, unsweetened and natural, and pitted (!!). You have no idea how many summers I have contemplated baking a cherry pie but gave up because that meant either A. going to a shop and buying a cherry pitter or B. pitting the cherries with my bare hands. Both didn’t sound too appealing to me, so I always ended up eating them just as they are. The climate in Germany isn’t right for growing great peaches, apricots, watermelons and nectarines, but let me say, german cherries rock.  The first time I tasted cherries here was at a BBQ party after a friend’s final recital many years ago. Her parents brought a huge bucket full (not joking) of cherries from their garden. I think I might have eaten at least a third of that bucket (also not joking). One can assume of course, that I had a  slight tummy ache the next day from gluttony. It was worth it though.

Today’s recipe is a combination of all things cherries should be paired up with. Chocolate, orange, and almond. I had a box of marzipan in the fridge from my dear friend Dobi who brought it as a gift from LĂĽbeck. It was definitely a clever gift because she knows I love to cook, and I prefer something that I can use in the kitchen rather than a box of chocolate with marzipan. The crust for this tart is the usual tart crust plus unsweetened cocoa powder to enrich the chocolate experience even more. Next time I make this again, I will stir in the marzipan in the last minute so it retains its shape a bit. I added the marzipan to the cherries too early so they melted away. I like little bites of marzipan here and there.

wpid-20140210_195334.jpgwpid-20140210_201809.jpg

As Valentine’s Day is coming up, maybe some of you would want something delicious and rich like these tartlets to eat with your loved ones. I won’t be really doing anything with my boyfriend, because we are not really the ones to celebrate it. I’ll probably curl up on the couch and watch the new season of House of Cards which happens to come out on the 14th. (Huuraaaah!!). In any case, whatever you are doing, happy cooking and/or have a fun Valentine’s Day!

Chocolate Cherry Tartlets 

Note: It is important to fill the tartlet cases with blind-baking beans to prevent the dough from shrinking in the oven while baking. A 500g bag of cheap dried beans or dried peas would do the job.  If you have a jar of pennies, it would work just as well. 

Makes 4 12cm round tartlets, or one 20-22cm tart (one of these tartlets will probably serve two people unless you are greedy)

For the Crust,

115g all-purpose flour

65g rye flour (or substitute with more all-purpose flour)

50g unsweetened dutch-pressed cocoa powder (I used this for example)

3 Tbsp sugar

1/4 tsp salt

120g cold butter, cubed

1 egg yolk

Zest of 1 orange

2 Tbsp cold water

For the filling, (inspired by Ruby Tandoh’s recipe on the Guardian a few weeks back)

500g frozen sour cherries

70g sugar

70g dark chocolate (70% cocoa), finely chopped

100g marzipan, cut into small cubes

2 Tbsp orange juice

1.5 Tbsp lemon juice

3 Tbsp corn starch

To serve: whipped cream, chocolate shavings

1. Make the crust.  In a food processor with a blade attachment, add the flours, sugar, salt, orange zest and cocoa powder. Pulse 4-5 times to combine.

2. Add the cubed (cold!) butter. Pulse 6-7 times until the flour resembles sand and pebbles. Add the egg yolk and cold water. Pulse 6-7 times again until the dough comes together when you pinch a small amount between your fingers. Tip out the dough onto a surface or a large bowl. Knead 2-3 times (very quickly) just to gather the dough. Divide the dough into 4. Wrap them individually in a cling wrap film. Chill in the fridge for at least 30 mins.

Alternately, if you don’t have a food processor, you can cut the butter into the flour with your fingers or a pastry scraper. Make sure to work quickly, and preferably with an open kitchen window, as coldness is essential in a tart recipe.

3. Preheat the oven to 180 degrees celsius. Roll out the tart dough with a sprinkle of flour to prevent from sticking. Line the tartlet cases with the rolled out dough. Prick the bottoms of the tartlet cases a couple of times. Line the top of the dough with baking paper. Fill the tartlet pans with blind baking beans or pennies. (see recipe note) Bake for 2o minutes.

4. Take the blind baking beans out and bake the tartlet cases for 5 minutes further. Let the tartlet cases cool down completely.

5. Make the filling. Over a medium-high heat in a medium saucepan, add the frozen cherries, sugar, lemon and orange juice. Stir around until the cherries are thawed and start to release their juices. Add the chocolate and marzipan and stir to combine. Turn the heat down to low. Add the corn starch and stir until the cherries thicken.

6. Fill the cooled tartlet cases with the filling. Chill the tartlets in the fridge or on your balcony. Serve with a dollop of whipped cream and shavings of chocolate.

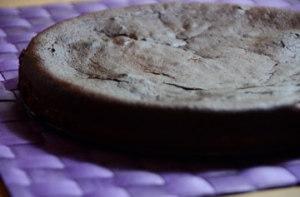
Decadent flour-less chocolate cake with cardamom and smoked salt

choc cake

I went to Dresden yesterday to go to a concert of the Staatskapelle Dresden playing Mahler 9. Afterwards my friends and I have decided to have a girl’s night in. It has been far too long since our last gathering, and we were all very excited. Everyone decided to bring something, and I have offered to bring a chocolate cake. Not just any cake, but my aunt’s flour-less chocolate cake. It’s so decadent and chocolaty that you can only eat a thin slice of it before calling it a day, although I think we all had two servings each last night. I don’t bake all that often, as I rarely have cravings for sweet things and for some reason my kitchen looks like a bomb has been dropped after I bake. But this moist, rich, melt-in-your-mouth cake that I haven’t made in over a year seemed perfect for our gathering.

This recipe was told to me by my mum over the phone over 10 years ago. I vaguely remember her saying that this was from one of her sisters. I scribbled the recipe down in very messy writing in one of my cookbooks back then. I have three aunts on mum’s side and they are all avid cooks (including mum). My second aunt even went to a professional culinary school decades ago and is an accomplished contributor to food magazines, cooking class teacher and cookbook author. The first aunt is the baker of the family, who bakes incredibly delicious cakes for family gatherings, and the third aunt is an excellent cook and photographer who helps my second aunt with making cookbooks and testing recipes. But having said all that, I still can’t remember from which aunt this recipe was from. Sorry whoever’s this was. Please take credit for it in the comment box if you want, dear aunty!

DSC_1167 DSC_1189

This chocolate cake is incredibly easy to make. The only slightly annoying part is separating 5 eggs into yolks and whites, without accidentally breaking the egg yolk into the white, which can happen if your stars aren’t aligned right on the day you bake (or just carelessness). If anything gets into the egg white, such as grease or egg yolk, you can say goodbye to beating the whites until firm peak forms. But my mum has given me a tip on how not to ruin the egg whites. I’ll include in the recipe below. The basic recipe remains the same, but I’ve decided to put some crushed green cardamom seeds and smoked salt in the batter. Cardamom is a great pairing with chocolate. It has a very light eucalyptus note, and as it is a member of ginger family, containing a floral and and citrussy note. Cardamom’s fresh and invigorating note cuts through richness in chocolate. Salt is a natural partner of chocolate and it brings out the flavour of cocoa very well. Be sure to use nice finishing salt such as fleur de Sel or even smoked salt which I had luckily in hand in a salt tasting kit given to me by a very good friend a year ago. And last but not least, make sure you buy the best chocolate (preferably certified organic and fair-trade) and cocoa powder you can find. It will make a huge difference in the end!

Happy baking everyone!

Decadent flour-less chocolate cake with cardamom and smoke salt

Note: If you don’t like cardamom, zest of an orange-a classic pairing with chocolate- could be used instead. It will taste just as good!

Serves: 8-10

5 organic/free-range eggs, separated *(see note below)

120g butter

6 cardamom pods

120g good quality dark chocolate (70% cocoa)

120ml cream (try to take it out of the fridge at least 30 minutes before baking)

70g good quality raw cocoa powder (usually found at organic stores or health food stores)

120g sugar (less if you will be serving this cake with sweetened cream)

A pinch of normal sea salt

A pinch of finishing salt such as fleur de sel or smoked salt

1. Pre-heat the oven to 180 degrees celsius. Bring water in a small saucepan to simmer, and place a bowl over the pan but make sure that the bottom of the bowl doesn’t touch the water. Add chopped chocolate and butter in the bowl over simmering water and stir until melted.

2. Crush the cardamom pods lightly in mortar&pestle until the seeds fall out. Take the pods out and crush the seeds until they roughly resemble powder. Add to the chocolate and butter.

3. Add the cream to the melted butter and chocolate. Warm through and stir until well incorporated. Take the bowl off the saucepan and set aside to cool a bit.

4. Separate the eggs. Whisk the egg whites until lightly firm peak forms. Make sure you don’t over beat it, otherwise the cake might turn out grainy. Set aside.

5. In another bowl, beat the egg yolks and sugar together until pale.

6. Add the sifted cocoa powder to the yolks and whisk until well incorporated.

7. Add the melted chocolate and butter, and small pinch of normal salt. Stir until well incorporated.

8. In three batches, gently fold in the egg whites.  Make sure the whites are well mixed in after each batch.

9. Pour the batter into a buttered cake pan. (mine was 26cm but I think smaller pans would work just as well). Sprinkle a pinch of flaky salt on top. Bake for 25-30 minutes. Do NOT over bake. Leave to cool in the cake pan. This cake is best served the day after it is baked, as the flavour will improve.


*Separating the egg whites: If the stars aren’t aligned right on some days (so to speak), you might break the egg yolk while separating the egg. This is my mum’s trick. She separates the egg whites into a small ramekin before putting into a big bowl where the whites will be beaten. This way, if you accidentally break the egg yolk, you can get another egg and start again without ruining the other 2-3 (or more…no!!) eggs you have separated before.