Pomegranate Molasses and Harissa Glazed Carrots with Cashew-Ginger Cream

DSC_5763

Growing up, I was never a picky eater. I ate almost everything, from cow’s milk from 6 month old with no allergy whatsoever, (I still wonder what mum was thinking when she decided to give a baby cow’s milk?!) to fish, kimchi from an early age, and blood soup, according to my aunt. I still have no idea what the soup is, but she claims when I was 3, she saw me eating a small bowl of a pork soup with coagulated blood floating on top, without blinking twice. I definitely wouldn’t eat it now, though. Another story goes, when I was about 2-3, our family went to a restaurant, where a big aquarium with exotic tropical fish was at the entrance. Most kids would have stared at the aquarium and probably admired the beautiful fish, but I saw them as source of food, and said “Mmm, Yummy! I want to eat them all!”.  What a weirdo.

There were few things I didn’t like when I was little, most of them I still don’t like to this day. I thought soy milk was the most disgusting thing ever, I almost puked the first time I tried it. My old flatmate from a few years ago, told me vanilla-flavored soy milk didn’t taste too much like soy milk, but I still found it disgusting. I also despised carrots, raw, or cooked. It took me a very long time to like carrots. I was a teenager when I decided I like carrots when they are cooked, or should they be served raw, they must be grated or julienned. Don’t ask me why. But I still find raw carrot sticks repulsive. My friends laugh at this, of course. I can’t tell you why it’s ok for me to eat grated carrots and not the stick. It could be the aroma, or the texture? Who knows.

The carrot, being one of three components of mirepoix, (the other ones being celery and onion), is sometimes overlooked. I always have one or two laying around in the kitchen, in case I spontaneously want to make a soup or stew, and although when you have sweated the finely chopped carrot in oil for 20 mins with onion and celery, you won’t be able to taste it, but you will notice a difference to a soup when the carrot is missing. Carrots are usually cheap and plentiful almost anywhere you live. They come in beautiful rays of shades, like purple, white, yellow, pink, and orange. They can be paired with many different spices and herbs, and when roasted, the natural sweetness intensifies, especially when they are glazed like in this new recipe. I would have never guessed as a 9 year old that I would ever make a dish where the carrot is the star on a plate. It’s a simple recipe to make for a weeknight dinner. I can also imagine it would be great as an accompaniment to turkey or chicken. Enjoy! xo-A.

Pomegranate Molasses and Harissa Glazed Carrots with Cashew-Ginger Cream

Note: Pomegranate molasses and Harissa can be purchased at turkish/arab supermarkets. Make sure the molasses has as little ingredients as possible. Most of them contain a lot of additives and such.

Serves 2 as an appetizer or a side dish

1 bunch thin-ish carrots (about 8-9), left whole, but halved if they are too thick

For the glaze,

1.5 tsp honey

1.5 tsp pomegranate molasses

1-2 tsp harissa (store-bought is fine)

2 Tbsp olive oil

1.25-1.5 tsp salt

1 tsp coriander seeds, lightly crushed

1/2 tsp caraway seeds

Freshly ground black pepper

1 large clove garlic, grated to a pulp

For the cashew-ginger cream,

60g cashew nuts

40ml water or vegetable stock

A good squeeze of lemon juice

1/2 tsp ground ginger

To serve: A few coriander leaves and/or mint leaves, and a good pinch of roughly crushed pink peppercorns.

1. Preheat the oven to 160 degrees celsius.

2. In a small saucepan, heat the honey over low heat until they become very runny. Add all the ingredients for the glaze and whisk well. Line a baking sheet with a parchment paper. Lay the carrots on the sheet, brush all over with the glaze until they are well covered. Roast for about 45 mins until the carrots are tender. Toss them gently once or twice for even cooking.

3. For the cashew cream, cover the nuts with boiling water and set aside for about 30 mins. This process will soften the nuts. Drain and rinse quickly with fresh water.

4. In a food processor, add the cashews and the rest of the ingredients. Blend until smooth. Add a bit more water or stock if the cream is too thick.

5. Serve the glazed carrots, sprinkled with coriander leaves and/or mint, and a good dollop of the cashew-ginger cream on the side.

A simple autumn slaw

DSC_5718

After a wonderful summer of traveling, chilling on the beach of Langkawi, tasting new food, indulging myself in mum’s amazing food and learning to cook Malaysian cuisine, I’ve been back in Leipzig for about a month and a half now. It seems like I blinked and missed September all together and, although I have been cooking a lot, for some reason I haven’t been keeping up with my new recipes on this little space of mine. So, here I am, after almost a three month interlude.

Today was market day. There are gorgeous apples everywhere these days. Fennel bulbs of all sizes seem to be having its high point, as the morning air becomes crisp. I bought my first bunch of kale the other day, and now I finally feel the change of season. My boyfriend’s parents have a big walnut tree in their beautiful garden, and every October, they bring a big bag full of walnuts for us.(shelled! I’m eternally grateful.) Today for lunch, I have decided that all these amazing autumn ingredients call for a little celebration to welcome the new season. This simple slaw is dead easy to make, especially if you have a mandolin slicer at home. Otherwise, a very sharp knife will do the job of slicing the fennel bulb wafer thin. If you can’t find kale, I think a bulb of radicchio could work in a pinch. The slight bitterness would well compliment the sweet-sourness of a crisp new season’s apple.

I hope all of you had a lovely summer/winter, depending on which hemisphere you live in. xo-A.

Kale, Fennel, and Apple Slaw

*If you are using radicchio instead, as I suggested in the intro, you won’t need to massage the leaves. Just toss all the ingredients with the dressing.

Serves 2

5 meidum-large kale leaves

1 tsp apple cider vinegar

1/4 tsp salt

1 small handful walnuts, toasted

1 small fennel bulb, sliced wafer-thin, if possible

1/2 crisp new season apple, sliced very thinly

For the dressing,

Juice of 1/2 lemon

1.5 tsp walnut oil

3 tsp rapeseed oil or mild-tasting olive oil

A splash of maple syrup

1/2 tsp Dijon mustard

1/4-1/2 tsp salt to taste, and a few grinds of pepper

1. First, pick off the leaves off the kale, leaving the tough stalks in your compost bin. Give them a good wash. Squeeze out the water with your hands, and chop the leaves finely. In a big salad bowl, add the kale, along with the apple cider vinegar and salt. Get your clean hands in there and massage the kale for about 2-3 minutes until the leaves are welted. Leave to stand for about 30 mins.

2. Preheat the oven to 150 deg celsius, place the walnuts in the oven for about 8-10 mins until they are nicely toasted. Do check after 6 minute mark to see if they aren’t burning. Transfer the walnuts to a plate and cool until ready to use.

3. Whisk all the ingredients for the dressing until well emulsified.

4. Add the fennel and apple slices to the kale. Add about 3/4 of the dressing and mix well with two forks. Check to see if the slaw needs some more dressing. Scatter the toasted walnuts and serve immediately.

Lemongrass and Coconut Tempeh, Coleslaw in Peanut Dressing, and Coconut Brown Rice

DSC_1884

I have three new recipes for you today! Jackpot!

When I first saw a block of tempeh sitting next to tofu at an Asian grocer, I was put off by the way it looked. I vaguely see that there were some soybeans in the block, but the whole thing looked slightly rotten to me. (click here if you don’t know what tempeh looks like). I’ve never given a second thought about buying it until I started reading 101cookbooks.com. This wonderful blog was the first food blog that I started reading regularly and still do until this day. Tempeh showed up once in a while in her post and after a casual googling, I realized this block of off-looking soybeans was in fact a delicious food originating from Indonesia, and has spread to the western world as a healthy meat substitute. It’s fermented and therefore easier for your body to digest. It’s also full of vitamin B-6, iron, magnesium, and calcium. So after trying this recipe  from 101cookbooks, I was hooked. It’s meatier than tofu, and really delicious after being marinated and grilled. I know many people frown upon hearing the word “tofu” but this distant cousin, tempeh, my friends, is a whole different business.

After vaguely trying to plan a holiday to south-east Asia, I have created a marinade for tempeh that includes ingredients from there, and the result was absolutely delicious. Lightly coconut-y, spicy, and the addition of lemongrass and lime leaf made me want to teleport myself to the street food stalls in south-east Asia, although I imagine the food there would be a zillion times better than mine. 🙂 I paired the tempeh with coleslaw with peanut dressing that was inspired by the Gado-gado sauce from Indonesia, and coconut brown rice cooked with galangal and lime leaf. If you have never cooked with tempeh, give this a try. I swear you will be hooked like I did.


Lemongrass and Coconut Tempeh

Serves 2

250g tempeh, cut into triangles

1 lemongrass, 5cm from the root, the outer layer peeled, and the soft center part finely minced

1 lime leaf, finely minced

60ml coconut milk from a very well shaken can

1.5 tsp sambal olek or sriracha

1 Tbsp soy sauce

Juice of 1/2 lime

To fry, coconut oil or vegetable oil with high-smoking point.

To serve, a small handful coriander leaves

1. In a medium sized saucepan, bring water to boil. Add the tempeh and steam over medium heat for about 5 mins. This process eliminates the bitterness that might be present in some tempeh, and also it will make the tempeh absorb the marinade faster.

2. In a blender, add the rest of the ingredients and blend until smooth. Drain the tempeh and transfer them to a large but shallow casserole dish. Pour the marinade over and coat well. Marinate for 1 hour. It can sit in the fridge for a couple more hours if you want to make ahead of time. Flip once or twice.

3. Heat the coconut oil or vegetable oil in a frying pan over medium-high heat. Lay the tempeh slices in one layer and fry for about 4 mins. Flip and wait for 3 minutes. Pour the remaining marinade and reduce to a thick sauce.

DSC_1877

Coleslaw with peanut-chili-coconut dressing

Serves 4-6 as a side

1/2 head small green cabbage, finely sliced

1/2 head small purple cabbage, finely sliced

3 spring onions, white and green parts, finely sliced

1 large carrot, julienned

1/2 large kohlrabi, julienned

1 bunch coriander, chopped

A small handful mint leaves, chopped

A handful roasted peanuts, roughly chopped

For the dressing,

2 Tbsp peanut butter

1.5 Tbsp soy sauce

2 Tbs coconut milk

1 thumbnail sized ginger, peeled and roughly chopped

2 small cloves garlic

1.5 tsp sambal olek or sriracha

1 lime, juice only

3 Tbsp olive oil

1 tsp palm sugar or raw cane sugar

1. In a large bowl, mix the chopped and sliced vegetables.

2. To make the dressing, add all the ingredients in a blender and mix until smooth. Check the seasoning. The dressing at this stage should be a little salty. Not to worry, the vegetables will absorb some of the salt.

3. Toss the dressing and the vegetables thoroughly, preferably with hands.  Leave to rest for 30mins to 1 hour. Scatter the peanuts on the salad before serving.

Coconut Brown Rice with Lime Leaf and Galangal

Serves 2

1 cup short-grain brown rice

1 cup coconut milk

1/2 cup water

2 lime leaves

A thumb-nail sized galangal or ginger, sliced

1/2 tsp salt

To serve: Lime wedges

1. Wash the brown rice and soak, if possible, for 4-8 hours.

2. In a medium sized sauce pan, bring the rice and the rest of the ingredients to the boil and turn the heat down to low. Steam the rice for 35-45 mins, until tender and the liquid has been absorbed. Fluff the rice with fork.


Roasted Spring Vegetables with Za’atar

DSC_1776

Beautiful spring vegetables have finally arrived at the farmer’s market in Leipzig last friday. I bought my first bundle of green asparagus of this year from Frau Müller’s local vegetable stand, a bunch of crunchy pink radishes from the organic stand from a farm near Halle, and yellow and orange carrots from a new organic stand.  Frau Müller always has beautiful local green asparagus, unlike the other asparagus stands where they only sell the thick white ones. Most germans I know don’t seem to eat the green ones. At the beginning of May when the asparagus season really starts kicking off, I can usually get 3 bundles for 10 Euros from Frau Müller, because she says not many people are interested in them and she needs to get rid of them before she packs up to go home. When I first came to Germany, I had no idea that there were any white asparagus. And boy, do the germans go nuts over them. I have to say, they looked, ehem, strange to me. It was 7 years after I first set my foot in this country did I finally try the white ones. My boyfriend doesn’t cook (I’m not really sure what he ate before he met me?!) but one night after work, he told me to come over and try the white asparagus with potatoes. He just peeled and boil them in salted water, and served with steamed potatoes and butter. It was that simple, but I loved it! Since then I buy both when they come in season. I still prefer the green ones though. Simply because they look so much better on a plate, and they don’t need to be boiled for 20 minutes until soft. I love the crunchiness of somewhat undercooked green spears, or even raw in salads.

DSC_1740

DSC_1779

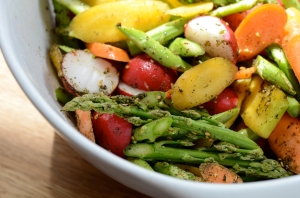
In this dish I just created for lunch, green asparagus, radishes, carrots, and cauliflower florets are roasted with za’atar and olive oil. Za’atar is an aromatic middle eastern herb-spice blend I discovered when I went to Israel 6 years ago with my string quartet. I just received a fresh batch from my best friend who traveled to Israel a couple of months ago. They are certainly greener and tastier than the ones I still have from my trip (oops). I served the vegetables with a simple bulgur pilaf and dollops of lemony chive yogurt. You can eat them with just bread, or even flat breads with even more za’atar and olive oil.

Enjoy! xo-A.

Ps. My Saffron and garlic beans with wine-braised leeks made it to The Guardian Cook section last weekend. I’m stoked! 🙂

DSC_1792

Roasted Spring Vegetables with Za’atar, served with Bulgur Pilaf and Lemony Chive Yogurt Sauce

Note: Make sure you season the vegetables well with salt. And do not over-bake them! Leipzigers, you can buy Za’atar at the herb/spice store in the Königshaus Passage. And lastly, vegans can just sprinkle a little more lemon juice on the vegetables before serving instead of the yogurt sauce. Or use vegan yogurt if you like. 

Serves 3-4

For the vegetables,

1 bunch of pink radishes, trimmed and halved

400g green asparagus, sliced at 5 cm interval

6 young carrots, sliced biased, thin-ish

1/2 small head of cauliflower, broken or cut into small florets

6 small shallots, peeled and halved

3 tsp Za’atar, divided

Glugs of olive oil (didn’t measure. sorry!)

About 2.5 tsp salt, divided

1 tsp lemon juice

Bulgur Pilaf,

1 clove garlic, finely minced

1 shallot, finely minced

1 tbsp tomato paste

150g medium bulgur

375m water

1 Tbsp chopped mint leaves

1.5 tsp cumin powder

Lemony chive yogurt,

125ml full-fat yogurt or greek yogurt

Zest of 1/2 lemon

1 tsp lemon juice

2 Tbsp chives, finely chopped

Salt&Pepper


1. Pre-heat the oven to 190 degrees celsius. In a large bowl, mix the cauliflower florets and shallots with 1 tsp za’atar, 3/4 tsp salt, and a glug of olive oil. Spread them out on a large baking sheet lined with grease-proof paper. Roast for 15 mins.

2. In the same large bowl, mix the rest of the vegetables with 2 tsp za’atar, 1.5-2 tsp salt, pepper, and a large glug of olive oil. Take the baking sheet out of the oven and spread out the vegetables. Roast for another 15 mins until the vegetables are just tender. Stir once or twice in between. Once they are out of the oven, sprinkle them with some lemon juice and combine. Check the seasoning.

3. Meanwhile, make the bulgur pilaf. Heat the olive oil over a medium heat in a medium sized saucepan. Sautee the minced garlic and shallot for 4 mins until soft.

4. Add the tomato paste, stir around for 10 seconds or so. Add the bulgur and toast for 30 seconds. Add the water, bring to boil, and turn the heat down to very low. Simmer for 8-10 mins with the lid on, until the bulgur has become tender and absorbed all the liquid.

5. Take off the lid, and add the mint leaves and cumin. Check the seasoning.

6. To make the yogurt sauce, mix all the ingredients together in a small bowl. Lightly salt the sauce.

7. To serve, scoop out some of the bulgur pilaf, and the vegetables on top. Serve the yogurt sauce on the side, or in dollops over the vegetables.


Kohlrabi, Apple, and Bärlauch (Ramps) Kimchi

DSC_1593

Spring has arrived! If you are living in Germany, you might have guessed by the mention of Bärlauch in the title of today’s recipe. Bärlauch is called ramps in English, and directly translated, bear onion. 🙂  At glance, the leaves look like wide and tall grasses growing in the woods. Up close, rubbed between your fingers, they smell very strongly of garlic and onion. The first spring in Leipzig, I couldn’t make out where this onion-y and garlicky smell was coming from. My uni was right by the park, so the smell was kind of intense at times. In my second year in Leipzig, a Korean family invited me to eat Bärlauch pancakes at their place with Bärlauch they have foraged that day. It was so delicious. I mean, how could it not be, for someone like me who needs some kind of an allium at every meal. Since then, every year I wait for spring to arrive so I can go forage them. (for free!) The photo from 2008 underneath is a field of ramps growing in the woods in the spring.

IMG_5114

Kimchi is the most essential part of a Korean meal. It is served at every meal (not kidding). There are many many varieties of kimchi, and every household has a slightly different kimchi recipe.  I only started making kimchi myself only a year ago -shame on me- and I have to say, I was so proud of myself when my kimchi has fermented properly and tasted somewhat like my grandmother’s. I think I was steered away from making it before because I thought it was somehow super difficult to make and to ferment. (it is not).

DSC_1571

wpid-IMG_20140225_183116.jpg

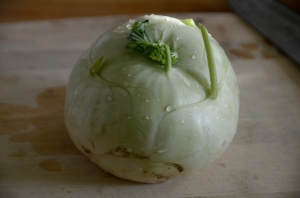
Kimchi can be made out of cabbage, Korean radish, cucumber during the summer, spring onions or chinese chives. I have opted for kohlrabi while looking to develop a new kimchi recipe. To quote Yotam Ottolenghi on kohlrabi, “People often ask me what to do with kohlrabi, an often unwanted child in the organic vegetable box. It seems to healthy, too weird, too German!” (from Plenty) Yup. This explains how I felt about kohlrabi when I first saw it. Maybe I have lived in Germany for too long, but I have become fond of this weird vegetable of brassica family. It’s delicious julienned in salads, and cooked in curries. I originally wanted to use pink table radishes while developing this kimchi recipe but they don’t come in season for another month or so, and kohlrabi can be bought at any given time of the year at german supermarkets. The boskoop apple gives a sweet and slightly sour contrast to the garlicky and spicy ingredients. I’m not sure if my grandmas would be confused or annoyed when I tell them I have included diced apple in my kimchi. Because I added a bunch of Bärlauch, I only added a small clove of garlic. I still want you to be able to meet friends after eating this kimchi. Bärlauch can be quite pungent especially when they have grown bigger.

Happy pickling everyone!

Kohlrabi, Apple, and Ramps (Bärlauch) Kimchi

If you can’t find kohlrabi, replace with a bunch of pink radishes. Ramps are hard to come by in some places, so a small bunch of spring onions would do the trick.

Makes a 500ml jar

1 kohlrabi, peeled and top and bottom trimmed, and diced

1 Boskoop apple, cored and diced (Granny Smith can be substituted)

30g ramp, roughly chopped

1 Tbsp sea salt

1 Tbsp all-purpose flour

2 Tbsp boiling water

1 tsp finely grated ginger

1 small clove garlic, germ removed, then finely grated

2 Tbsp Korean chili flakes

1/2 tsp Korean fish sauce (Optional)

1/2 tsp sugar

1. In a large bowl, toss the kohlrabi cubes with salt and let them sit for one hour. Drain, saving any brine from kohlrabi. Run the kohlrabi cubes very briefly under cold water. Drain well.

2. To make the sauce, sift the flour in a small bowl. Add the boiling water and whisk until it becomes a smooth paste. Add the brine, grated ginger, garlic, chili flakes, Korean fish sauce, if using, and sugar. Stir to combine.

3. Toss the kohlrabi, apple, and ramp in the sauce until well coated. Transfer to a clean jar and close the lid tightly. Let it ferment at room temperature for 24 hours before serving. Keep it in the fridge and eat within a week.

Crunchy broccoli in chili and garlic oil à la Chinabrenner

wpid-20140121_191946_1.jpg

There is a small handful of restaurants in Leipzig that I really like and respect, and Chinabrenner is on that list. It is situated in Plagwitz, a former industrial area of Leipzig, and the restaurant is in an old warehouse building.  My ex flatmate told me about this place many years ago. She used to work around the corner from Chinabrenner, and I remember her telling me about a chinese place where you can get a bowl of stir-fry and rice with a cup of tea for 4 euros that doesn’t taste like boring old oily take away chinese food (!). They didn’t used to have dinner back then, I don’t think. Nowadays, lunch costs 6.50, which isn’t bad actually, and they have great dinner. Soooo good, in fact. It comes with a price tag in the evening, but it is worth going all the way to Plagwitz area for authentic chinese, mostly Szechuan cuisine. (I actually don’t like to use the word “authentic” but it is really that good).

wpid-20140121_190548_1.jpg

I went to China on an orchestra tour almost 4 years ago. Despite people telling me about their negative experiences in China, I ate incredibly well there. I ate mostly vegetarian, and Vegetarian Lifestyle in Shanghai was definitely a highlight. I also ate at an upscale Szechuan specialty restaurant in Beijing (not that Szechuan is anywhere near there..) which was also fantastic, and a tongue numbing experience. Since then, I have been interested in cooking chinese. Watching this documentary from BBC with the great Ken Hom and ChingHe Huang made me even more eager to learn.

wpid-20140121_185007.jpg

One of Chinabrenner’s dishes that all my friends and I order every time, is cold broccoli. The broccoli florets are barely cooked, and they are dressed in a pretty large quantity of spicy chili and garlic oil, sprinkled with a healthy dosage of Szechuan pepper. Man, do those tiny peppers numb your tongue! My attempt at this dish might not taste exactly like at the restaurant, but I think it’s pretty close. I reduced the amount of oil, and added slightly more acidity, making the dish more salad like. The key to this dish is to barely cook the broccoli. I add the florets in boiling water for 30 seconds only, just enough to take out their raw edge. The chili bean paste among other ingredients can be found at Asian stores.  Bon Appetit!

2014-01-22 10.25.22

Crunchy Broccoli in Chili and Garlic Oil

Serves 4 as a side dish

1 large head broccoli, cut into small florets and the stalk peeled and chopped into matchsticks
60ml vegetable oil
4 cloves garlic, minced finely
2 hot chili flakes OR 1-2 dried hot chili, crumbled.
1 Tbsp Shao Shing Wine
2 1/2 Tbsp Soy sauce
1 1/2 Tbsp Rice vinegar
1/2 Tbsp Balsamic vinegar or dark chinese vinegar
1 tsp chinese chili bean paste
1 tsp Szechuan pepper, toasted and roughly ground
1 tsp sugar

1. Bring a pot of water and a teaspoon of salt to boil. Add the broccoli and boil for 30 seconds only. Drain and refresh under cold water to stop them cooking. Let the broccoli drain well.
2. In a small frying pan, heat the oil over a medium heat. Add the minced garlic and chili flakes. As soon as they start to sizzle, turn the heat down to low and let them soften for 10 minutes.
3. Mix the rest of the ingredients in a bowl. Add the garlic and chili oil and whisk to combine.
4. Put the well drained broccoli in a large bowl. Toss with the dressing. Chill for an hour in the fridge and serve.

A Christmas Salad

DSC_1383

Happy 2nd Advent everyone! ‘Tis 17 more days till Christmas. I had a very calm advent all by myself, as my boyfriend was away having two concerts in one day. Having the apartment all to myself, I have to say I thoroughly enjoyed the day. I watched Searching for Sugar Man, a fantastic documentary that brought a couple of tears to my eyes. Then I went into the city to buy some chocolate to make these delicious black bean chocolate biscuits. Having turned on the oven for the biscuits, I roasted the butternut pumpkin right after the biscuits came out, and proceeded to make this Christmas salad creation of mine that I had in mind for some days now.

As my close friends have probably realized by now, kale is my top 5 favourite vegetable. I wait eagerly for it to arrive when the weather turns cold. This year, the arrival of my beloved leafy veggie was almost 3 weeks late due to warm autumn. It was really cold, I swear, but according to the girl at my Demeter stand at the market, it was apparently too warm for kale to grow and be harvested here in Germany. The first time I tasted kale was only about 6 years ago in my shared flat with Paige. She bought this weird curly looking leafy vegetable on a november day, and made me a simple bowl of pasta drizzled with a hint of balsamic vinegar in the end. It was so delicious that I was hooked from then. (Thanks!) Coming originally from Korea, I welcome anything leafy in my kitchen; spinach, any kind of salad leaves, steamed pumpkin leaves, or other delicious Korean leafy vegetable that become a part of “Banchan” (side dishes)  -And may I add, 2007 was a time before kale became a hipster vegetable that everyone blogged about. 🙂

DSC_1354 DSC_1361

I have been eating kale in salads for just over a year now. I thought it needed to be cooked, as the leaves are kind of tough to be eaten raw. But after reading recipes on other blogs, I learned if you marinade the leaves in something acidic like lemon or vinegar, the leaves wilt and become tenderized. This particular salad uses the best of autumn/winter vegetables. Roasted butternut cubes are a frequent guest in my kitchen, and roasting red onions bring out their sweetness with a slight hint of smokiness. Pomegranate seeds not only look like pretty little pink jewels, the juice that bursts out when you bite into each seed taste lightly tangy and sweet. I tossed in some cooked chestnuts in the spirit of Christmas too. The dressing is made with heavenly brown butter that taste nutty (hence the name in french, Beurre Noisette), and you can detect all the Christmas-y spices like cinnamon, ginger, and vanilla. The taste of these spices are subtle, but I like it that way. If you would like more of a kick, then feel free to adjust the amount of spices.

Have a nice week! And bon appetit!

A Christmas Salad (Kale, roasted butternut&red onion, pomegranate, and chestnut salad in spiced brown butter dressing)Phew, that was long! 

Serves: 2 as a starter (can be easily doubled or tripled)

A bunch of kale (About 7-8 stalks)

1/2 Tbsp red wine vinegar or juice of a 1/2 lemon

A good drizzle of olive oil

1/2 small butternut pumpkin, cut into big-ish cubes

5 very small red onions, peeled and halved

4 Tbsp pomegranate seeds (or more, if you like)

5 chestnuts (I used cooked and vacuum-packed variety for faster preparation), chopped roughly

For the dressing:

1 Tbsp red wine vinegar

1 small shallot, finely chopped

20g butter

1/3 of a vanilla pod, halved length-wise

1/3 tsp ground cinnamon

1/3 tsp ground ginger

1/3 tsp ground cumin

A pinch of chili flakes (optional)

1 Tbsp red wine vinegar

salt&pepper

1. Separate the kale leaves from the stalks. Discard the stalks. Chop the kale leaves into small bite-sized pieces. If the leaves seem to be tough, cut them into shreds. Toss the kale leaves with red wine vinegar, a good drizzle of olive oil, and a good pinch of salt. Massage the leaves briefly so they leaves soak up the dressing evenly. Leave for 30mins or more. This will wilt and tenderize the leaves.

2. Pre-heat the oven to 180 degrees Celsius. Peel and chop the butternut into big–ish cubes. Toss the butternut with red onion halves in olive oil, a pinch of salt and pepper. Lay them on a baking sheet in one layer, not too crowded, and bake for 20-30 mins until lightly browned and lightly tender. (check after 15 mins) The butternut pumpkin should not be over cooked. The cubes should retain their shape.

3. Make the dressing. Mix the shallot and vinegar in a bowl to macerate. In a small pan, melt the butter in medium-low heat. Keep heating the butter until there are brown bits appearing on the bottom of the pan. Keep an eye on the pan, as butter can burn very quickly. Once the butter smells nutty and brown bits have formed, pour it into the bowl of vinegar and shallot.

4. Add the ground ginger, cumin, cinnamon, and chili flakes (if using) into the melted butter. Scrape the seeds off the vanilla pod and add to the butter as well. Add the vinegar, salt (I added 1/2 tsp, but taste as you go), and pepper. Whisk to emulsify. Taste the dressing, and add more spices, or salt to your liking.

5. Toss the kale, roasted butternut, chestnuts, pomegranate, and roasted onion with half of the dressing. (gently!). Taste if the salad needs more dressing. Add more to your liking, but the dressing should not overpower the salad.