Vermicelli Salad with Green Coconut Dressing

wpid-2015-06-12-08.48.51-1.jpg.jpeg

Today was wonderful. I cooked and ate all day. I found Burrata (!) at my farmer’s market, which was definitely a highlight. I ate some home-grown white asparagus, from my cleaning lady’s garden, baked a pie, and ate this fabulous salad for dinner. The whole of May up until a few days ago have been so stressful. I had so much work, which doesn’t get easier even if you have one or two free day(s) a week, and if you commute half the time to a city that is 100km away. Anyways, the weather finally turned warm this week, and I was home all day today, planned to do absolutely nothing. The farmer’s market in Leipzig was bursting with strawberries, white asparagus, cherries, and other early summer goodies. I bought a bunch of mint, coriander, and thai basil a few days ago. I have… ehem… thrown out more than a few shares of leftover herbs in my life. I would buy these three herbs mentioned above for a vietnamese or thai feast, then forget about them, and find them in inedible state a week later in my crisper box. Yeah… It’s not something I’m proud of. So today, I have decided to use up all the leftover herbs for a scrumptious bowl of summer salad. A very large handful of these herbs went in a small food processor with coconut milk, lime juice, green chili, ginger, spring onion and etc. You can use any kind of vegetables to you liking, and thin rice noodles would also work in place of vermicelli.

Vermicelli Salad with Green Coconut Dressing

Serves two

For the dressing,

1 large spring onion, sliced finely

1 thumbnail sized ginger, chopped finely

2 cloves garlic

1 Tbsp vegetable oil

A very large handful mixture of coriander, thai basil, and mint leaves

Juice of 1/2 lime

3.5 Tbsp coconut milk

2-3 dashes fish sauce

1-2 tsp soy sauce

1/2-1 medium hot green chili

1. To make the dressing, sautee sliced spring onion, ginger, and garlic with oil over medium-high heat. Once they start to soften, transfer to a food processor. Add the rest of the ingredients. Blend until smooth. Adjust the acidity and seasoning to your likings.

For the salad, (like I said, this is only an example. Add anything you like to the salad bowl)

50g vermicelli, soaked according to package instruction

Lettuce leaves

Handful radishes and greens, sliced and chopped finely

Cucumber, finely sliced

Zucchini, julienned

Avocado, broken into small chunks

Enoki mushrooms

Food in Leipzig Series: Dong Xuan Center

wpid-img_20150516_141714.jpg

Have you ever wondered, where all the Vietnamese immigrants in Germany go out to eat? There are many here in east Germany, including Leipzig, but I couldn’t seem to find a great bowl of Pho or other delicious Vietnamese food anywhere. There is a restaurant on our street that can be pretty decent from time to time, but they are so stingy with giving herbs. I haven’t been to Vietnam, but from my culinary education on the net and books tell me that Vietnam is one of two countries in the world (the other being Iran) where they eat a large basket full of various aromatic herbs with their food. Apart from the stinginess of herbs, the places I know here in Leipzig are pretty standard fare. Berlin probably has the largest Vietnamese community, and recently there has been a extremely delicious, and dare I say, authentic restaurant opening up every other week. (My favourites are Si An in Prenzlauerberg, and District Mot in Mitte). I also visited dark and grey Lichtenberg once, to go to a Vietnamese warehouse called Dong Xuan Center. They also have fantastic food, mostly accommodating Vietnamese immigrants.

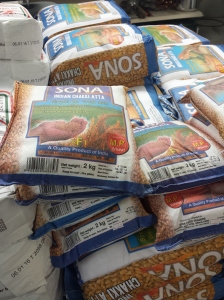
Chapatti flour I found at an Indian supermarket.

Chapatti flour I found at an Indian supermarket.

One of two Indian supermarkets. Decent.

One of two Indian supermarkets. Decent.

Back in Leipzig, I wished I had something similar here. Last week, my cleaning lady asked me if I have been to a large “Asia Markt” on Maximillian Alle. I don’t usually go to that part of town, as there is pretty much nothing there. I googled it immediately, and found out that there’s a large Vietnamese warehouse like the one in Lichtenberg. Today, my boyfriend and I took a short S-bahn ride to Leipzig Nord, for a mini food adventure. Most of the stores sell ugly clothes (at last to me), bags, and other odd stuff, but they have a few supermarkets. The Asia Markt in the city has a very good selection of fresh produce, but these ones in Dong Xuan Center had much more. I didn’t recognise half of their greens and herbs. They also have fresh tofu, interesting but unrecognizable food wrapped in banana leaves, live mini crabs, meat and their innards, and home-made pickled mustard leaves. I also found two Indian supermarkets with spices, lentils, chapatti flour (!!), and somewhat limited amount of fresh produce Needless to say, I was impressed. Lunch was of course, a delicious bowl of Pho at a small place called Dong Xuan Quan. I walked in, and I knew I found a gem because the whole place smelled like pho broth. There were 6 different kinds of Pho. I ordered the regular pho with thinly sliced beef, and my boyfriend had the one with pounded beef. The broth, people, was the one I was looking for. It was savoury, had depth, and served with a large amount of coriander, and spring onions. And guess how much a bowl cost? 6! 6 euros! A bargain, if you ask me. When we were almost done with our bowl, a group of young second generation Vietnamese-German walked in, speaking in perfect Sächsisch, which I found pretty amusing.

What is this??

What is this??

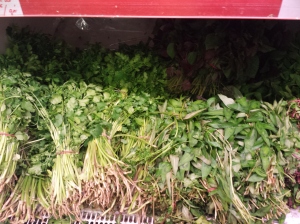
Coriander, vietnamese mint, perilla leaves....

Coriander, vietnamese mint, perilla leaves….

Live crabs!

Live crabs!

Vietnamese amaranth greens

Vietnamese amaranth greens

I will definitely be going back to Dong Xuan Quan when I have get a crave for Pho. I’m wondering now though, if they have a special menu for Vietnamese? Next time, I will also find out what all the greens and herbs I didn’t recognize. In meanwhile, I’ll be cooking with a bunch of amaranth greens I found today.

Dong Xuan Center: Maximilian Alle 18. S-bahn stop, “Leipzig Nord” 

Dong Xuan Quan: Here. Turn left once you walk in the area, continue until the end of the second building, and turn right.

Scores from Dong Xuan Center

Scores from Dong Xuan Center

Creamy Amaranth Porridge with Asparagus, Herbs, and Poached Egg

Processed with VSCOcam with f2 preset

Spring is finally here!

Today, I bought my first bunch of green asparagus of the year. For me, this marks the beginning of a new season. Some might tell me I have been “germanized”, but I quite like the enthusiastic welcoming of some seasonal vegetables here. I love to eat oatmeal, or porridge in the morning, flecked with some fresh or dried fruit, and a drizzle of maple syrup. But, this one I just made is a whole different game. The main grain used is amaranth, with some oats in the back ground. I used some typical south-east Asian ingredients, such fragrant lemongrass, keffir lime leaves, and a good amount of coconut milk to give this savory porridge a creamy consistency.

Amaranth is a nutritional powerhouse. It is high in protein, calcium, magnesium, fiber and potassium, and has been grown since the Aztec era, although sadly the Spaniards have eliminated it when they invaded the new world. It is luckily making a come back. It has similar nutritional values as quinoa, but at half the cost.

Make this delicious porridge for lazy brunch on a sunny spring weekend. You will really spoil yourself and your loved ones. Cheers!

Creamy Amaranth Porridge with Asparagus, herbs, and Poached Egg

*Note: Kefir lime leaves can be found in frozen section at any asian supermarkets. Lemongrass can be found either fresh, or frozen. If you can’t find edamame, use frozen peas instead. If using peas, add them to the porridge with the asparagus.

Serves 2-3

2 tsp vegetable oil
1 small onion, finely chopped
1 garlic clove, finely chopped
1 thumbnail sized ginger, peeled, and finely chopped
1 lemongrass, tender inner part, finely chopped
4 keffir lime leaves
5 coriander stalks, finely chopped
100g amaranth, washed and drained
40g rolled oats
440ml coconut milk
200ml water or vegetable stock
A handful edamame, shelled (substitute with peas, if unavailable. See recipe note*)
8 green asparagus, trimmed, and cut into bite sized pieces
5-6 ramp (wild garlic or bärlauch) leaves, finely chopped
Salt&pepper

To serve,
Coriander leaves
Lime wedges
Poached eggs
Sriracha hot sauce

1. Heat the oil in a medium saucepan over a medium heat. Add the onion, garlic, ginger, lemongrass, coriander stalks, and lime leaves, and cook until soft.
2. Add the amaranth, oats, edamame, coconut milk, a good pinch of salt and water. Bring to a boil, put the lid on, and turn down the heat to medium-low.
3. After about 15 mins, add the asparagus and ramp leaves. Turn up the heat to medium. Stir constantly for about 5 until the asparagus and amaranth are tender, and has reached a porridge consistency. Remove the lime leaves. Check for seasoning. Add some freshly ground pepper.
4. Serve with coriander leaves, lime wedges, hot sauce, and poached eggs on top.

wpid-img_20150409_142702.jpgwpid-img_20150410_150607.jpg

North Indian Spiced Butternut Pumpkin and Split Pea Soup with Garlicky Chard

wpid-2015-04-02-02.40.14-1.jpg.jpeg

I know, I know. It’s April, and you might be asking, why on earth is she posting a butternut pumpkin soup recipe? Let’s say, that spring hasn’t exactly arrived here in Germany. The past week has been a bit of a whirlwind, both the weather and health-wise for me. The weather was basically like this; crazy, cold wind, sun, rain, hail, storm, all in one day. And me, well, I haven’t felt so crappy in a long time. After getting tests done for more than 24 hours, (which obviously included staying at the hospital. Eeek), I told the doctors that I would probably feel worse if they kept me there for yet another night, even if it’s just for observation. The food there, as with most hospital food, was pretty disgusting. The good news is, they haven’t found anything. The bad news is, I almost feel worse after the tests. Spinal tap, or lumbar puncture, turns out to be the most painful thing I have ever experienced. Anyways. I’m home now, and despite the pain in along spine, and dizziness, I whipped up this soup. (feel free to call me Wonder Woman 😉 )I feel a bit better now. I promise you, I’ll be posting a spring recipe soon. I haven’t been to the market in a while, but with the weather like this, I doubt the farmers have any new seasonal vegetables. Meanwhile, stay healthy, and those of us in Germany, hang in there. There will be rhubarb, asparagus, peas, and other wonderful new season’s produce very soon. xo A.

North Indian Spiced Butternut Pumpkin&Split Pea Soup with Garlickly Chard

*Recipe note: The ingredient list seems long, but most of the spices should be easy to buy, or you might have them already in your pantry. The idea of topping the soup with greens was adapted from Deborah Madison’s Vegetable Literacy.

** For those in Leipzig, Yellow Split peas can be found at the Asian market on Hainstr., or at selected organic supermarkets such as Macis or Denns in Höfe mall on Goerdelering. 

Serves 3-4

1 small butternut pumpkin, split in half length wise, seeds and membranes scooped out

1/2 cup (sorry didn’t measure in grams) yellow split peas, washed well

1 Tbsp rapeseed oil, or coconut oil

5 whole cardamom pods

5 cloves

5 cm cassia bark, or cinnamon stick

2 bay leaves

2 small onions, chopped finely

2 garlic cloves, chopped finely

a thumb-sized ginger, peeled and chopped finely

1 tsp coriander

1/4 tsp turmeric

1/2 tsp chili powder

125ml coconut milk

1-2 tsp lime juice

For the chard,

1/2 Tbsp rapeseed oil or coconut oil

1 large clove garlic, finely sliced

1 hot, dried chili,

6-7 leaves chard, finely sliced

1/2 tsp garam masala

A dash of lime juice

1. Turn on the oven to 200 degrees celsius. Rub the pumpkin halves with a bit of oil, lay them, cut side down, on a lined baking sheet. Roast until the flesh becomes soft. Remove from the oven and let cool.

2. In a heavy bottomed, large sauce pan, over medium heat, add the oil, cardamom, cloves, bay leaves, cinammon, and onions. Stir around until they become soft and lightly golden. The spices will smell wonderfully fragrant. Add the garlic and ginger, and stir for about 2 mins.

3. Add the coriander powder, turmeric, and chili powder. Stir once or twice, before adding the split peas, 1.5 tsp salt, and 1l of filtered water. Bring to a boil, cover, and simmer for about 30 mins, or until the peas are tender. Remove the cardamom pods, bay leaves, cinammon, and cloves. They should be fairly easy to find.

4. Scoop out the pumpkin flesh, discarding the skin, and add to the sauce pan.  Add the coconut milk. Puree with a hand held blender, or a blender of your choice, until smooth. Add the lime juice. Check for seasoning.

5. For the chard, in a medium sized frying pan, over medium heat, add the oil, garlic, and chili. Once the garlic becomes soft and lightly coloured, add the chard, and 1/2 tsp salt. Stir for about 2 mins, add a good splash of water, and immediately cover with a lid. Let it steam for a minute or two. Remove the lid, add the garam masala, and stir for another minute. Stir in a dash or two of lime juice.

6. Serve the soup with some chard on top.

Matcha-Tahini Smoothie

Processed with VSCOcam with c1 preset

2014 was the year of green juice and smoothie. People were seem to be buying Vitamix blenders and slow juicers like these gadgets were the latest fashion accessories. I wonder about food trends sometimes. Although I do admit, we don’t eat or style food like we did back in the 70s (canned pineapple slices, maraschino cherries, baked with ham, for example.), and thank goodness those days are long gone, who on earth starts these crazy trends? Smoothie has been around way longer than kale juice. Until about a couple of years ago, kale juice was mostly drunken by bygone hippies from the 60s and 70s ,who still owned the same juicers from back then. Back in high school in Adelaide, a new smoothie bar opened up. It was called Boost Juice. Many of my friends went there on weekends to buy smoothies with super food supplements. The word “super food” wasn’t really around at the time, and we, or at least, I, felt cool drinking blueberry mango smoothie with wheatgrass powder, acai berry, or other strange supplements that were foreign to a 17 year old self. I must admit, those over priced smoothies kept me going during my final exams. Unfortunately, friends back in Australia tell me that Boost Juice isn’t what it used to be. What a shame.

Regardless of the smoothie trend in the last years, I’ve been making smoothies regularly in my kitchen for breakfast for a long time, especially when I’ve had too much to eat the night before, when I have overripe bananas, or when I’m just too lazy to chew. (Bless the person who invented the hand-held blender). Matcha, or also known as green tea powder, became popular in Korea and Japan in the past decade. It’s hailed has “superfood”-whatever that means in reality- by the health food bloggers since last year or so, and somebody decided almond milk matcha latte is the new new green juice of 2015. My annoyance aside, I’ll always love matcha. The grassy, vegetable-y, and slightly bitterness is so unique. It isn’t so forth coming on your palate, like black tea, for example. It’s like drinking green tea, but tastes and smells more grassy. In Korea, one of my favourite cafes is run by a green tea company, O’sulloc, from Jeju Island. The cafe is tastefully designed, and not only do they have amazing ranges of tea, but many of their pastry products incorporate matcha. I always get a chocolate mousse cake with green tea when I’m there. They also have fluffy matcha chiffon cake, matcha truffles, matcha shaved ice… you name it.

This smoothie I made this morning is healthy, invigorating, and easily put together. Matcha powder isn’t cheap, but a little goes a long way. Mine was brought back from Japan by my friend Max a couple of years ago, and I just got two new tins of matcha from my boyfriend who came back from a tour in Japan. I guess I’m one lucky woman. (thanks guys!) 🙂

Matcha-Tahini Smoothie

Serves 2 or 1 generously

2 small-medium bananas

200ml yogurt of your choice (cow, sheep, soy, coconut..whatever)

150ml water or coconut water

2 tsp matcha powder

1.5 tsp honey or date syrup

1/4 tsp pure vanilla essence

1.5 Tbsp tahini

Sesame seeds, or other chopped nuts for topping (optional)

1. Peel and slice the bananas. Freeze them overnight.

2. Blend the rest of the ingredients with the bananas until smooth.

Korean Mung Bean Pancakes (Nokdu Jeon)

wpid-img_20150202_124022.jpg

Most people probably have fond memories of their grandmothers’ cooking, even though their cooking might not have been Michelin-star worthy, or it might not have been a culinary firework every time. For me, whatever my grandmothers whip up in their kitchen reminds me of their warmth and love. Their food always tasted different from my mother’s. My mother grew up eating her mother’s amazing food, but hasn’t set her foot in the kitchen until she was married. She learned most of her cooking from my paternal grandmother. Her cooking, could be said, is a direct blood line from my paternal grandmother, mixed with her memories of the taste she grew up with,

Koreans love savoury pancakes. They are made with wheat flour, buckwheat flour, or ground mung beans, and filled with spring onions, seafood, pork, kimchi… you name it. They taste amazing with milky rice wine, Magkoli, on a rainy day. (not sure why?) On chinese new year, or as Koreans call it, “old” new year, both of my grandmothers make stacks of pancakes for the family. My paternal grandmother has always been the queen of mung bean pancakes, and the maternal grandmother makes some mean, crispy kimchi pancakes. As I was making these for lunch today, the smell reminded me so much of the new year’s gathering with my family, which I haven’t enjoyed in over 10 years. My mother says that, to make these pancakes well, one must reach the age of 60+. Well, here’s my vegetarian take on the mung bean pancakes (Nokdu Jeon 녹두전) from my maternal grandmother. Someday, maybe mine will taste as good as my grandmothers’.

Korean mung bean pancakes

*Note: You can leave out the kimchi if you have a hard time finding it, but the pancake definitely tastes better with kimchi. Nowadays, it should be easy to find it in Asian or Korean grocers. It’s usually found in the fresh produce aisle. (In Leipzig, the Asian grocer on Hainstr. has vacuum packed ones)

Makes: 4-6 pancakes
150g hulled and split mung beans (can be found at asian or indian grocers), also called mung dal
5 Tbsp brown rice flour (or rice flour)
A big handful mung bean sprouts
1 tsp roasted sesame seeds
4 dried shiitake mushrooms, soaked and re-hydrated in hot water.
1 spring onion, finely sliced
50-70g kimchi, finely chopped (can be found at Asian grocers, in fresh produce aisle)
240ml water
1/2 tsp salt
1 mild fresh red chili, sliced thinly, for garnish
vegetable oil, for frying
For the dip
1 spring onion, finely sliced
1/2 Tbsp rice vinegar or white wine vinegar
1.5 tsp sugar
3 Tbsp soy sauce
2 tsp water
1 tsp toasted sesame seeds
A pinch of chili flakes
1. Rinse the mung beans in several changes of water. Soak them in plenty of water for about 12 hours.
2. In a small pot, bring water to a boil. Add the mung bean sprouts and cook for one minute. Drain and rinse under cold water. Squeeze them between your hands to get water out as much as possible. In a large mixing bowl, mix the sprouts with a pinch of salt and sesame seeds.
4. Drain the shiitake mushrooms. Discard the stems. Squeeze out the water. Slice the caps finely and add to the mung beans sprouts.
5. Drain and rinse the mung beans. Add them to a mixer or food processor, along with water, salt, and rice flour. Grind them into a fine paste. Add the paste to the large mixing bowl with mushrooms and sprouts. Add the chopped kimchi. Mix well.
6. Heat a tablespoon of oil in a none-stick frying pan over medium-high heat. Add a small ladle in the pan and flatten them. Flip, once the bottom turns golden and crispy. Cook the other side until golden. Repeat.
7. For the dip, mix all the ingredients together. Serve the pancakes with the dip on the side.

Maple-Buttermilk Pots de Creme with Caramelized Pecans

Processed with VSCOcam with m5 preset

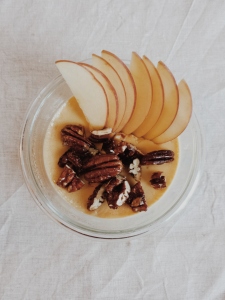
Guys, do you want to impress your guests with a dessert, that’s absolutely delicious yet easy to make? This is it! Pots de creme sounds fancy because it’s in french..  🙂 (honestly, pots of cream, or custard don’t sound as good) but it’s basically baked custard in small individual cups. This one is made with tangy buttermilk and cream, topped with crunchy maple syrup and rum glazed pecans and apple slices.

Maple-Buttermilk Pots de Creme with Caramelized Pecans

Serves 4-6

175 ml buttermilk
175ml single cream
80ml maple syrup, preferably B grade
1/2 tsp pure vanilla essence
A pinch salt
1.5 tsp cornstarch
4 egg yolks

For the pecans
50g pecan halves
2 Tbsp maple syrup
1 tsp dark rum
a good pinch salt

To serve: apple slices or pear slices

1. Preheat the oven to 150 degrees celsius. Bring the buttermilk, cream, maple syrup, vanilla, and salt to a gentle simmer. Meanwhile, whisk together the egg yolks and corn starch in a small heat proof bowl.
2. Once the cream mixture is heated to a gentle simmer, take it off the heat. Pour a small ladle into the egg yolks in a steady stream while whisking constantly. Pour the mixture back into the pot, while whisking constantly.
3. Over a low heat, whisk the cream-egg mixture until it just starts to steam. Do not let the egg yolks curdle.
4. Pour the mixture into small, oven proof cups/pots. Place the pots in a deep baking dish, pour hot water in the baking dish, until the water comes half way up the sides of the pots. Bake for 30mins. Let the pots cool to a room temperature before putting it in the fridge for at least 4 hours.
5. To glaze the pecans, mix all the ingredients together and lay them out on a lined baking sheet. Bake for about 10-15 mins in 150 degrees celsius, stirring once half way through.
6. Serve the pots with chopped pecans and sliced apple of pear.

Earl Grey Milk Jam

Processed with VSCOcam with m5 preset

Happy new year, everyone!

I hope your end of the year was filled with love, wonderful and indulgent food, and delicious wine. Are you on a detox? I’m not a believer of detox, but I do cut down on a few things in January, like meat (I eat a lot of meat in December, compared to the rest of the year), less alcohol, and a little less cheese (because frankly, how can you cut down on cheese completely?). Sugar? Yes, of course we all should cut down on sugar, but on cold grey mornings, I swear this recipe will brighten up your day. It will be your new Nutella. It’s super easy to make, and it can be doubled with no trouble. The jam or confiture de lait, is full of creamy, milky, sweet goodness with a hint of earl grey. Spread some on toast, drizzle over pancakes and waffles, or just spoon straight out of the jar. Go and make this today! Xoxo A.

Earl Grey Milk Jam

This is adapted from my aunt’s cookbook, Cold Sweets. (available only in Korean, unfortunately!). To sterilize a jar, wash the jar and the lid in hot water with soap. Dry upside down in an oven over 110 degrees celsius for about 10 mins. 

* Make sure you use a wide frying pan with high sides, and a silicon spatula for baking*.

Makes a 200ml jar

250ml whole milk

2 earl grey tea bags

250ml single cream

2.5 Tbsp raw cane sugar or vanilla sugar

1 Tbsp honey

A pinch of salt

30g butter

1. Heat the milk to a gentle simmer. Remove from the heat and steep the tea for about 10 mins. Remove the tea bags.

2. In a medium to large frying pan with high sides, bring the infused milk, sugar, honey, and salt to a gentle simmer. Stir until the sugar has dissolved.

3. Add the cream to the milk in 3 batches, stirring constantly until the cream has been incorporated.

4. Add the butter, and let it melt. Simmer the sauce in a medium heat for about 20 mins, stirring frequently to prevent the jam from sticking to the bottom. After about 20 mins, stir constantly until the consistency of the jam is similar to a thin syrup. It will thicken up once cooled.

5. Pour into a hot sterilized jar and put the lid on to seal. Keep in the fridge for up to 5 days, although I’m sure it will be eaten up in a day or two!

Chestnut Gnocchi with caramelized Brussels Sprouts and Onion

Processed with VSCOcam with f2 preset

Everyone who loves to eat and cook, probably decides their next travel destination by food once in a while. I like nature, sure. I also like to visit great museums, landmarks, and historical sights. But a city or a country wouldn’t be on my priority, if it didn’t offer interesting and great food. One thing I love doing is going to markets and supermarkets whenever I visit a new city. I like to look at what locals are buying, and even ask a few questions, if I feel particularly curious. I was on an orchestra tour once many years ago in a small city in Hungary. I have to say, the food I had there was mediocre at best, but I loved the fact that they had chili pepper flakes and pastes on the tables in restaurants. There’s nothing that a bit of salt and chile pepper can’t fix, if the food is bland! 🙂  I went to a supermarket and there was a huge selection of chili pastes, that I was a bit overwhelmed with what to get. I asked a hungarian woman who was near by, who didn’t really speak any english, helped me gladly. I bought the pastes for my mum and other friends who like a bit of a spice in their food. Since then, I put on a huge smile, and ask the locals, and they will help with pleasure. Most of them are flattered that you are interested in their food.

My friend Paige, one of the best cooks I know, and I usually bring each other food as souvenir whenever we travel. I bought her some Korean chili paste, fermented bean paste, and dried fish for broth, whenever I went to my parents in Korea. This year, even though it wasn’t a lot, I  brought her a nutmeg in its shell from an organic farm in Penang, Malaysia. She also brings me back all sorts of wonderful things. The recipe I made for you today, was possible by the chestnut flour she brought me from Corsica a year ago. I love roasted or boiled chestnuts, but the flour was foreign to me until she presented me with a bag. It’s so aromatic, that you immediately want to bury your head in it. I made a couple of recipes with the flour, but the taste is pretty strong, that you don’t need a large amount. A bag  of chestnut flour from a health store or an organic store is not the cheapest flour you can find, but a little goes a long way.

Brussel sprouts and chestnut are a fantastic pairing. I avoided cooking with brussels sprouts for many years, because, let’s face it. A lot of people have traumas from overcooked, sulfurous smelling brussels. Since last year, I got my courage up, and cooked the them in a frying pan with lots of butter until they were beautifully caramelized. Guess what? My fear of brussels subsided. Everyone should cook them in this way. The slight sweetness and the chestnut aroma will balance out nicely with cruciferous brussels and caramelized onion. Making gnocchi is really easy once you read the direction properly. I find it easier than making fresh pasta. Give this a try, and you will be making gnocchi every week! xo-A

ps. I’ve been published in The Guardian almost every week this month. Check out here, here, and here, for my recipes. I was so stoked, naturally.

Chestnut Gnocchi with caramelized Brussels Sprouts and Onion

For the gnocchi,

500g large floury potatoes

120g all-purpose flour

45g chestnut flour, sifted

2 large eggs and 1 egg york, whisked

1/2 tsp salt

To finish,

25g butter

1 large red onion, finely sliced into half moon rings

300g brussel sprouts, trimmed

1/2 tsp fresh thyme leaves

1 tsp aged balsamic vinegar

a small handful hazelnuts, toasted, skin removed, and chopped

1. Turn the oven on to 220 degrees celsius. Prick the potatoes a couple of times, and bake for about 50 mins- 1 hour depending on their size.

2. Cut the potatoes in half, wait for a minute to cool down a little, and scoop out the flesh and discard the skin. (I know, it’s hot, but be brave)

3. In a large bowl, mash the potatoes. Add the flour, eggs, and salt. Mix with an wooden spoon and eventually, with your hand, until a smooth dough is formed. Add a bit more flour if the dough is too sticky, but make sure not to put too much flour, as the gnocchi will taste hard once they are cooked.

4.Divide the dough in half. Roll the dough into a long cigar shape and cut them into 1.5cm pieces. Roll them on a gnocchi board or on a fork.

5. Start a large pot of water onto a boil. Salt generously.

6. Meanwhile, melt the butter in a large frying pan over medium-high heat. Add the sliced onions and fry until lightly caramelized. Turn down the heat accordingly. This will take anywhere between 10-20 minutes. The wait is worth it.

7. Boil the brussel sprouts for about a minute. Take them out with a slotted spoon. Keep the water on a rolling boil.

8. Cut the brussels in half. Add the brussels and thyme to the onion, and stir-fry until lightly browned. Try not to stir them around too much.

9. In the same water that brussel sprouts were cooked, add the gnocchi and cook for about 2 minutes or until they float to the surface.

10. Remove the gnocchi with a slotted spoon and add them to the brussel sprouts and onion. Add a couple of tablespoons of cooking water. Mix everything together over medium heat for about a minute. Drizzle with balsamic vinegar and toss.

Pomegranate Molasses and Harissa Glazed Carrots with Cashew-Ginger Cream

DSC_5763

Growing up, I was never a picky eater. I ate almost everything, from cow’s milk from 6 month old with no allergy whatsoever, (I still wonder what mum was thinking when she decided to give a baby cow’s milk?!) to fish, kimchi from an early age, and blood soup, according to my aunt. I still have no idea what the soup is, but she claims when I was 3, she saw me eating a small bowl of a pork soup with coagulated blood floating on top, without blinking twice. I definitely wouldn’t eat it now, though. Another story goes, when I was about 2-3, our family went to a restaurant, where a big aquarium with exotic tropical fish was at the entrance. Most kids would have stared at the aquarium and probably admired the beautiful fish, but I saw them as source of food, and said “Mmm, Yummy! I want to eat them all!”.  What a weirdo.

There were few things I didn’t like when I was little, most of them I still don’t like to this day. I thought soy milk was the most disgusting thing ever, I almost puked the first time I tried it. My old flatmate from a few years ago, told me vanilla-flavored soy milk didn’t taste too much like soy milk, but I still found it disgusting. I also despised carrots, raw, or cooked. It took me a very long time to like carrots. I was a teenager when I decided I like carrots when they are cooked, or should they be served raw, they must be grated or julienned. Don’t ask me why. But I still find raw carrot sticks repulsive. My friends laugh at this, of course. I can’t tell you why it’s ok for me to eat grated carrots and not the stick. It could be the aroma, or the texture? Who knows.

The carrot, being one of three components of mirepoix, (the other ones being celery and onion), is sometimes overlooked. I always have one or two laying around in the kitchen, in case I spontaneously want to make a soup or stew, and although when you have sweated the finely chopped carrot in oil for 20 mins with onion and celery, you won’t be able to taste it, but you will notice a difference to a soup when the carrot is missing. Carrots are usually cheap and plentiful almost anywhere you live. They come in beautiful rays of shades, like purple, white, yellow, pink, and orange. They can be paired with many different spices and herbs, and when roasted, the natural sweetness intensifies, especially when they are glazed like in this new recipe. I would have never guessed as a 9 year old that I would ever make a dish where the carrot is the star on a plate. It’s a simple recipe to make for a weeknight dinner. I can also imagine it would be great as an accompaniment to turkey or chicken. Enjoy! xo-A.

Pomegranate Molasses and Harissa Glazed Carrots with Cashew-Ginger Cream

Note: Pomegranate molasses and Harissa can be purchased at turkish/arab supermarkets. Make sure the molasses has as little ingredients as possible. Most of them contain a lot of additives and such.

Serves 2 as an appetizer or a side dish

1 bunch thin-ish carrots (about 8-9), left whole, but halved if they are too thick

For the glaze,

1.5 tsp honey

1.5 tsp pomegranate molasses

1-2 tsp harissa (store-bought is fine)

2 Tbsp olive oil

1.25-1.5 tsp salt

1 tsp coriander seeds, lightly crushed

1/2 tsp caraway seeds

Freshly ground black pepper

1 large clove garlic, grated to a pulp

For the cashew-ginger cream,

60g cashew nuts

40ml water or vegetable stock

A good squeeze of lemon juice

1/2 tsp ground ginger

To serve: A few coriander leaves and/or mint leaves, and a good pinch of roughly crushed pink peppercorns.

1. Preheat the oven to 160 degrees celsius.

2. In a small saucepan, heat the honey over low heat until they become very runny. Add all the ingredients for the glaze and whisk well. Line a baking sheet with a parchment paper. Lay the carrots on the sheet, brush all over with the glaze until they are well covered. Roast for about 45 mins until the carrots are tender. Toss them gently once or twice for even cooking.

3. For the cashew cream, cover the nuts with boiling water and set aside for about 30 mins. This process will soften the nuts. Drain and rinse quickly with fresh water.

4. In a food processor, add the cashews and the rest of the ingredients. Blend until smooth. Add a bit more water or stock if the cream is too thick.

5. Serve the glazed carrots, sprinkled with coriander leaves and/or mint, and a good dollop of the cashew-ginger cream on the side.